How Evals And Traces Change How You Build LLM-Powered Apps
When I first started building with LLMs, my whole process was basically fuck around and find out. I would randomly change system prompts, add tools, add integrations, and connect MCPs to my app without properly measuring how each addition affected what was already there.
I'll be coining that process the FAFO Loop.
Tweak the prompt, try three or four questions, looks good, ship it. A week later something that used to work just doesn't. I'd fix that one case and somehow break two others in the process. Rinse and repeat.
This post is basically what I learned getting out of the FAFO loop, in the order I'd do it if I started over.
TL;DR
- Trace everything. You can't improve what you can't see.
- Let users tell you when it's bad, but don't treat that as the truth.
- Read your traces and write down what "good" looks like before automating anything.
- Code checks first, LLM judges second, humans to keep the judges honest.
- Have an eval for every step of the pipeline, not just the final answer.
- Liked responses make great training data, but only after they pass your evals.
- Keep a hidden eval suite you never tune against, so you don't overfit to your own tests.
The FAFO loop
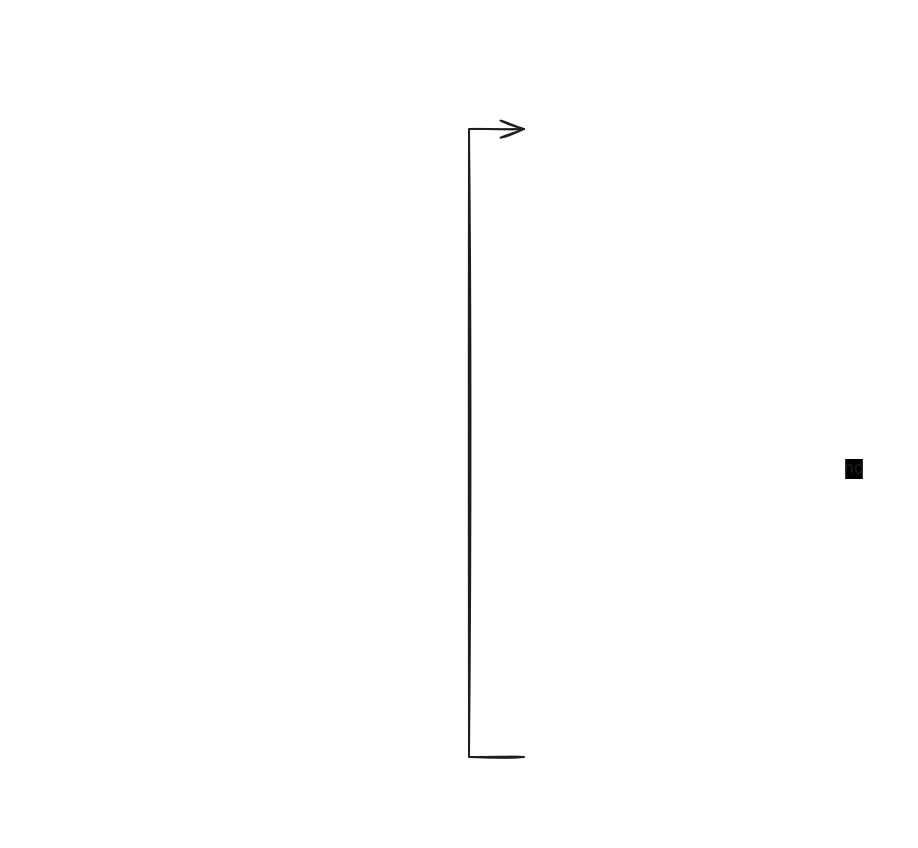
Evals are basically TDD for LLMs: write down the case, run the whole suite, compare before vs after. They're the memory the FAFO loop doesn't have. And it all starts with data.
1. Trace everything
The first thing that actually changed things for me wasn't even an eval. It was logging every step of every request and storing it (at first, I stored them in a simple CSV file). The input, the routing, which tools got called with what arguments, what came back, the prompt version, the model, and any feedback.
Take this example:
{
  "input": "How much did I spend on food this month?",
  "spans": [
    { "name": "route", "output": "spending_summary" },
    {
      "name": "plan_tool_calls",
      "output": { "tool": "get_expenses", "from": "2026-09-01", "to": "2026-09-30" }
    },
    { "name": "synthesize", "promptVersion": "v14" }
  ],
  "output": "You spent 8,420 on food this month...",
  "feedback": { "thumbs": "down", "comment": "that's September, I asked about October" }
}
The answer reads fine. The tools look correct, but it turns out the bug is the date range the AI provided to the tool call.
Without tracing that tool call and its parameters, your first instinct would probably be to check the underlying logic of the tool call rather than simply including the proper date in the system prompt.
Traces are not only your logs for debugging, but they are also your dataset for your evals. Nothing works better as a test prompt than something that a user actually tried and wants to have correctly answered.
2. Let users tell you
You can only come up with so many test questions yourself. Your users will ask things you'd never think of, so let them tell you when something is wrong.
A simple thumbs up/down on every answer goes a very long way. Now you start to see patterns on what users like. And once you know what responses users see as good, you can start using them as training data when you fine-tune models.
One thing to be careful with: a thumbs up doesn't mean the answer was right. If my app told someone they spent 8,420 on food when it was really 6,100, they'd probably still give it a thumbs up, because they don't know the real number. That's why they asked in the first place. So I treat feedback as a hint about where to look, not proof of what's correct.
3. Human in the loop: define what good looks like
Honestly, this is the step I skipped for way too long, and it's the one that helped the most.
Before writing any automated evals, I sat down and actually read through my traces, around 50 to 100 of them. For each one, I wrote a short note on whether the answer was good, and if not, what went wrong. I didn't try to sort them into categories at first. I just wrote down what I saw.
After a few dozen, the same problems kept coming up: wrong date ranges, answering a slightly different question than the one asked, and making up numbers that weren't in the data. Counting how often each one happened gave me a clear list of what to fix first, and that list became my plan for which evals to write.
The other thing I got out of this was a written definition of a good answer. For my app, it looked something like this:
A good answer:
- answers the question that was asked, not a similar one
- only uses numbers that came from the data
- says "I don't have that data" instead of guessing
These labeled traces became my golden dataset: real questions, each with a clear verdict on what correct looks like. One tip here: label them pass or fail, not on a 1 to 5 scale. It's way too easy to disagree with yourself about whether something is a 3 or a 4 depending on the day.
4. Deterministic checks first
Once you know how things fail, think of grading as a cascade: cheap and certain at the top, expensive and fuzzy at the bottom.

A surprising amount doesn't need an LLM at all: schema checks, the right tool got called, valid arguments, nothing internal leaked, latency budgets. Here's a very base level "no made-up numbers" check:
const NUMBER_PATTERN = /-?\d[\d,]*\.?\d*/g

const extractNumbers = (text: string) =>
  new Set((text.match(NUMBER_PATTERN) ?? []).map((n) => String(Number(n.replace(/,/g, '')))))

export const numbersAreGrounded = (answer: string, toolOutputs: string[]) => {
  const sourceNumbers = extractNumbers(toolOutputs.join('\n'))
  const ungrounded = [...extractNumbers(answer)].filter((n) => !sourceNumbers.has(n))
  return { pass: ungrounded.length === 0, ungrounded }
}
It'll flag some rounded numbers and mark it as wrong, but I'm fine with that as long as it catches the scariest failure of giving false numbers to my users. My golden rule with everything AI related: if you can make something deterministic, make it deterministic.
5. LLM-as-judge (and judging the judge)
Some things just can't be checked with code, like "did it actually answer the question that was asked?" For those, I use another model to grade the answer. This is what people call LLM-as-judge. The judge can be a smaller, cheaper model, as long as it agrees with your own labels (more on that below).
A few things made my judges a lot more reliable:
- One judge per problem. Instead of one judge grading "overall quality," I have a separate judge for each failure from my notes, like one for "answered a different question" and one for "made up numbers."
- Explain first, then decide. The judge writes out its reasoning before it gives a PASS or FAIL.
- Show it examples. I put a few of my labeled traces in the judge's prompt, so it knows what a pass and a fail look like for my app.
But here's the catch: the judge is also an LLM, so it can be wrong too. So I check it against the traces I already labeled myself, and I look at two numbers:
- TPR (true positive rate): out of the answers I marked as good, how many did the judge also pass?
- TNR (true negative rate): out of the answers I marked as bad, how many did the judge actually catch?
Don't rely on plain accuracy here. My first judge scored really well on accuracy, but only because most of my app's answers were already fine, so passing everything still looked "accurate." The TNR showed the real problem: it was letting almost every bad answer through.
To keep the judge honest, I tweak its prompt using one set of my labeled traces, then test it on a separate set it has never seen. And whenever I switch models, I check it again.
6. An eval for every step
In an AI pipeline, end-to-end evals won't catch everything. You need to have evals for every step in the process. An end-to-end eval only tells you that the final answer was wrong, not where it went wrong.
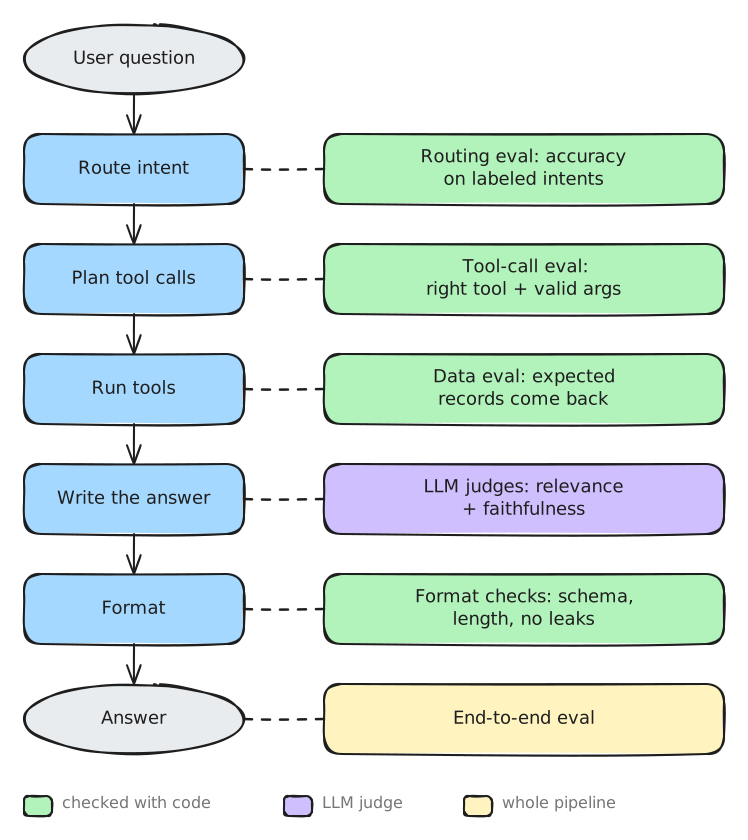
Here's what each step looks like, using the food question from earlier:
- Route intent. The app figures out what kind of question this is. "How much did I spend on food this month?" should go to the spending flow, not the budgeting flow. To eval this, I keep a list of questions labeled with the right intent and check how many the router gets right.
- Plan tool calls. The model picks which tool to call and what to pass it. This is exactly where the September bug lived. The eval compares the tool call against what it should have been: the right tool, the right category, and the right date range.
- Run tools. The tool actually fetches the data. Given the right arguments, did the expected records come back? This is plain old testing, no LLM needed.
- Write the answer. The model turns the data into a reply. This is the fuzzy part, so it's where the LLM judges from step 5 come in: did it answer the actual question, and does it match the data?
- Format. The final cleanup. Code checks make sure the answer is in the right shape, isn't too long, and doesn't leak anything internal like raw IDs.
The colors in the diagram matter too. Green is checked with plain code, purple is an LLM judge, and the yellow end-to-end eval runs the whole pipeline. Notice that most of the boxes are green. Only one step actually needs an LLM to grade it.
Failures also stack up. If each of your five steps works 95% of the time, the whole chain only works about 0.95⁵ ≈ 77% of the time. Five steps that each look "pretty good" on their own can still add up to something you'd never ship on purpose.
That's why it pays to eval each step on its own. Step evals are fast and cheap, since you're not running the whole pipeline every time, so they can run on every commit. And when the end-to-end score drops, they point straight at the broken piece instead of leaving you to guess which step went wrong.
7. Fine-tuning on what users liked
Once you have traces, feedback, and evals, the answers people liked can become training data for fine-tuning. But don't train straight on thumbs-up.

There are two paths into fine-tuning here, and both end at the same final check.
Path 1: liked responses (the main column). Every liked response has to earn its spot in the training set:
- Deterministic checks. It goes through the same code checks from step 4. If the format is wrong or a number doesn't show up in the tool results, it gets dropped right away.
- LLM judges. If it passes those, the judges from step 5 grade it. Anything that answered the wrong question or twisted the data gets dropped too.
- Human spot-check. I read a random sample of whatever's left. If I keep finding bad answers that slipped through, the problem is my filters, not the data, so I fix the checks and judges first before training on anything.
Only what survives all three ends up in the training set.
Path 2: disliked responses (the right side). When someone gives an answer a thumbs down and I write down what the correct answer should have been, I get a preference pair: the same question, the answer the model gave (rejected), and the answer it should have given (preferred). This is the data you use for preference tuning (DPO is the popular method), which teaches the model to pick the better of two answers instead of just copying examples.
The final check (the bottom). After fine-tuning, the new model has to beat the current one on the full eval suite, not just the cases it trained on. If it does, ship it. If it doesn't, keep the old one. Fine-tuning loves to fix one thing and quietly break another, and skipping this check is just the FAFO loop again, just with more GPUs.
One more rule: never let your eval cases leak into the training set. If the model trains on the same questions you test it with, your scores will look amazing for all the wrong reasons.
Honestly, try the cheap version first: pull the most similar liked examples (the ones that made it through the filters) into the prompt as few-shot examples. You get a lot of the benefit, and you can roll it back in one deploy.
8. Keep a hidden eval suite
Once your evals are running, it's easy to start overfitting to them. Every failing case gets a prompt tweak until it passes, and eventually your prompt is just a pile of special cases. The scores go up, but the app doesn't get any better at what real users ask next.
The fix is to split your golden dataset in two:
- A working set you run all the time and tune against.
- A hidden set you only run right before shipping, and never tune against.
If a hidden case fails, move it into the working set, fix it there, and replace it with a fresh trace. And if the working set keeps improving while the hidden set doesn't, you're fitting to the tests instead of fixing the app.
It's the same idea as testing the judge on unseen traces (step 5) and keeping eval cases out of training (step 7): anything you tune against needs a separate set you don't tune against.
Putting it together
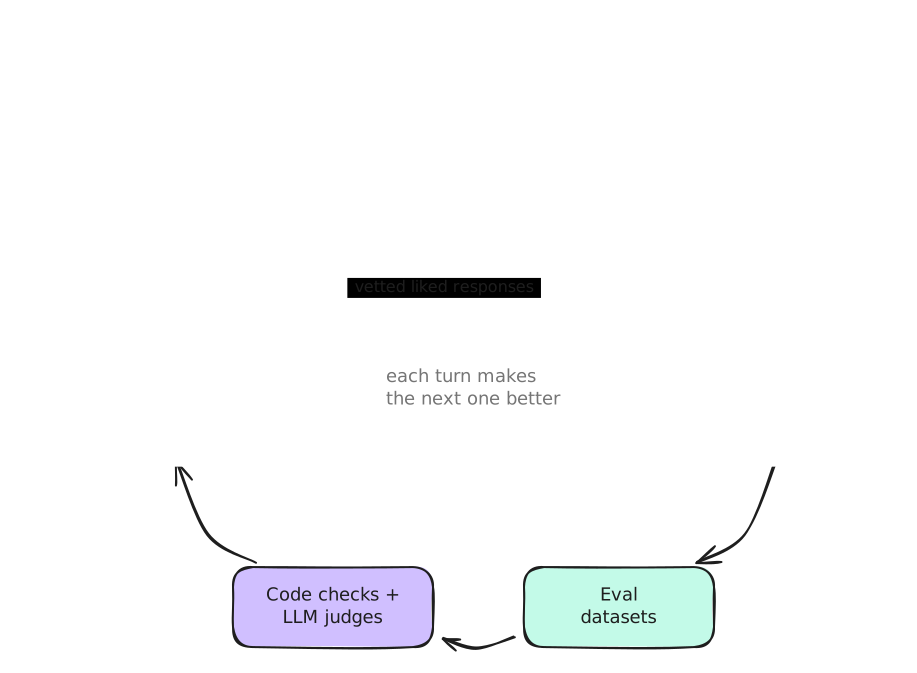
My process now: a bad trace comes in, I add it to the dataset, find the step that failed, make the change, run the evals, and only ship if the new case passes and nothing else regressed, including on the hidden suite.
So yeah. If you're still stuck in the FAFO loop, no judgment. I was there way longer than I'd like to admit. You don't need a fancy setup to get out of it. Start with traces, actually read them, and turn what you find into evals, one failing case at a time. Every eval you add is one less bug that can quietly come back.